Showing posts with label dessert. Show all posts

Tuesday, March 15, 2016

3 Ingredient Oatmeal Scotchies

These are my somewhat healthy go-to cookies of the moment.
They only require 3 ingredients (if a cookie mix counts as one ingredient) and they are so quick that I make them way to often.
Just add a single serve cup of applesauce to a package of oatmeal cookie mix and combine. Then mix in as many butterscotch chips as you would like and dig in - since there are no eggs in this version, the cookie dough is safe to eat.
Or bake them according to the directions on the package.
Enjoy!
P.S. Since there is no butter in the recipe - they do stick to the pan a bit so you might want to grease your pan first or use either parchment paper or a baking mat.

Tuesday, April 22, 2014

Homemade Reese's Peanut Butter Treats

I made these for Easter but these flower shapes could work for any spring celebration.
There are a million recipes online that all vary slightly but this is what I used:
16 oz of powdered sugar
1 and 1/4 cup of peanut butter
1/4 cup of butter
2 tablespoons half&half - or until you reach your desired consistency.
Some recipes also add graham cracker crumbs and/or brown sugar and honestly, the recipe above is approximate because after looking at so many recipes - I just kind of winged it.
Mix ingredients together and shape to your desire.
Put them in the freezer to harden.
Melt one package of Wilton candy melts or other chocolate coating of choice. It works best to put a little shortening in the chocolate so it's a little thinner for dipping. Take peanut butter shapes out of freezer and dip in chocolate coating. I usually use two forks and a spoon when dipping - the spoon to help cover the shape with chocolate and one fork to pull it out of the chocolate from the bottom and another fork to push the piece off of the other fork and onto the parchment paper to set up.
Decorate to your liking.
Happy dipping!
These take patience but they are worth it!

Tuesday, November 12, 2013

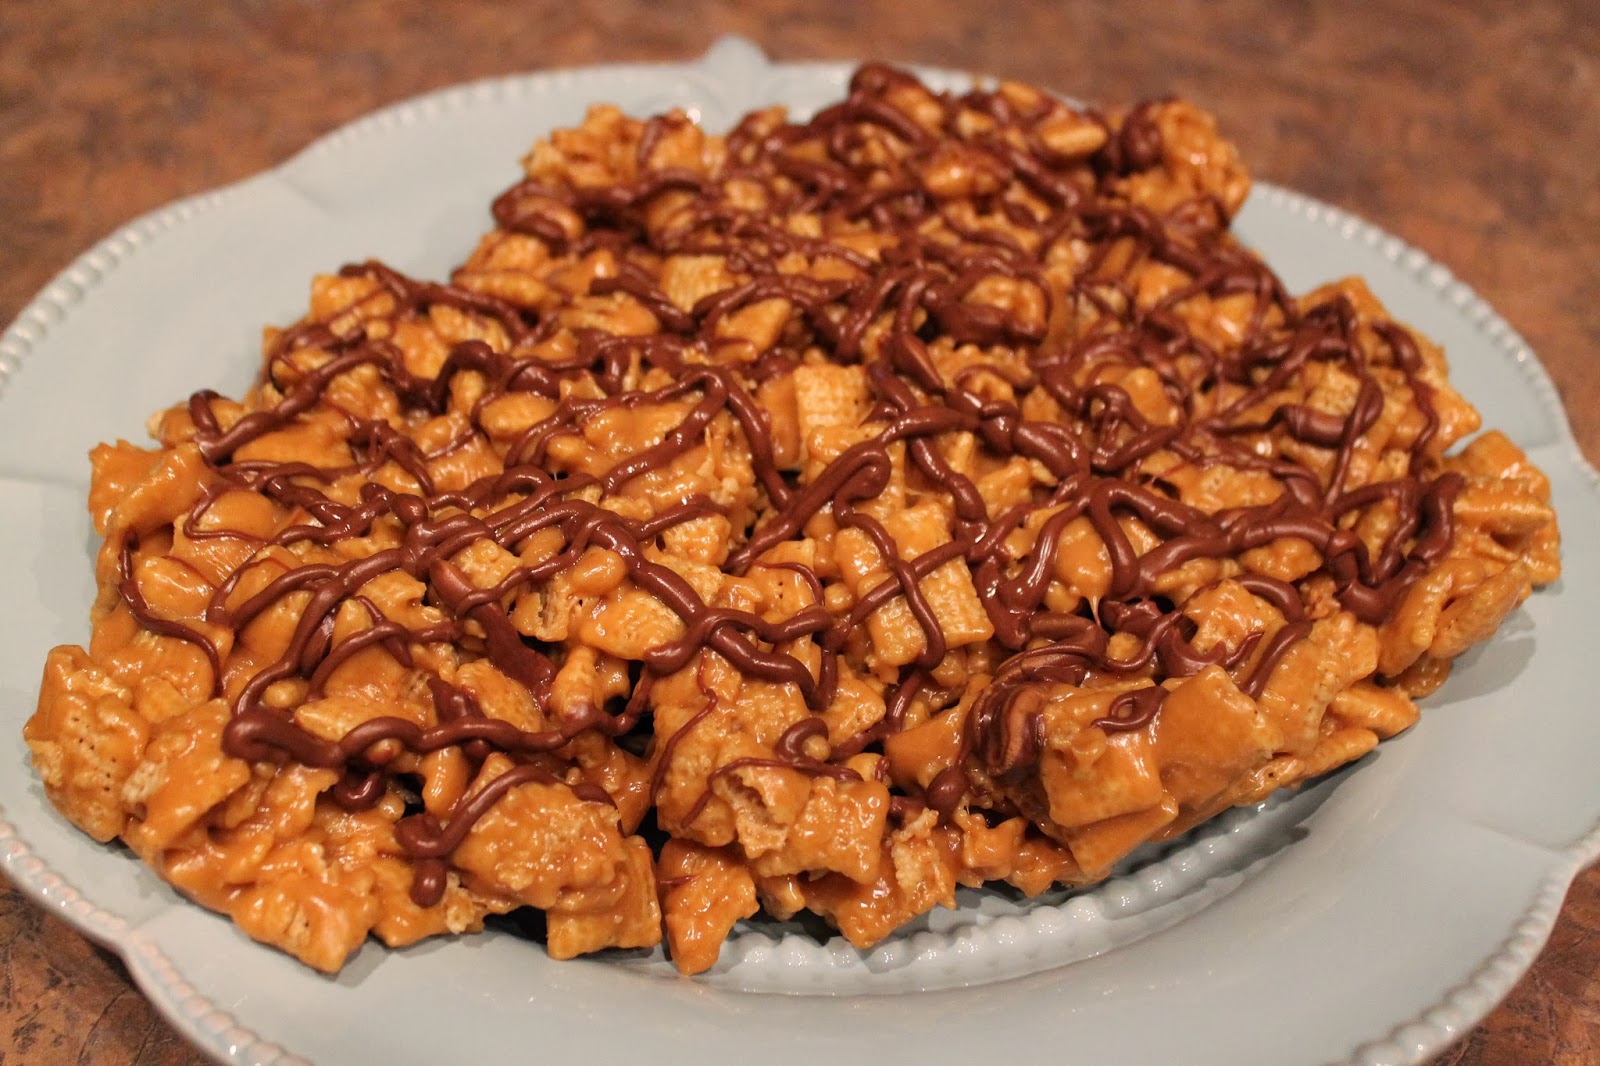
Peanut butter and chocolate cereal treats AKA Scotcheroos

This recipe had me at peanut butter and chocolate. I love that combination of flavors. Today at work I had the worst craving for something sweet. So much so that I almost went out and bought me some cookies from one of our local cookie shops.
As soon as I got home, I went to work trying to decide which of my hundreds of "Sweet Treats" pins I should make. I wanted something quick to make since I still had to make dinner too. I actually have made these twice before right in a row since they were so good.
This recipe is all over Pinterest - but here it is:
1 cup white sugar
1 cup corn syrup
1 cup creamy peanut butter
6 cups cereal - Chex, Rice Crispies - whatever you have on hand
1 cup chocolate chips
1 cup peanut butter chips or butterscotch chips
1 tsp vanilla
Stir the sugar and corn syrup in a sauce pan over medium heat until it comes to a boil. Then take off the heat and stir in your peanut butter - if you want the peanut butter flavor to stand out more then add another 1/2 cup. After the peanut butter is evenly stirred into the mixture, pour over cereal mixture and coat evenly. Press mixture into a greased 9x13 pan or just turn out onto parchment paper if you want to just pull chunks off to eat it like I do. Melt your chips together in the microwave in 30-second intervals. When melted, stir in the vanilla. Pour over the top of the cereal mixture and let set before cutting or just drizzle it on top like in my example.
I used half a bag of peanut butter and milk chocolate chips on these. I used a Ziploc bag to melt them in and then cut the corner off to drizzle over the cereal mixture.
This recipe is gluten-free also. Just check your cereal - I hear some of the off-brands are not always GF.
If you cut them in bars - which makes it easier if you are taking them to a party - they look something like this:
This is a pic from the first time I made these. Either way - they are delicious!

Monday, September 9, 2013

Circus Animal Cookie Truffles

Circus Animal Cookie Truffles
I came across these on Pinterest and just had to try them.
I had made the Oreo truffles a while back so I thought these would be about the same process.
The recipe is basically a bag of crushed Circus Animal cookies mixed with 1/2 can of frosting. You then roll them into balls and put them in the freezer for an hour or so - if you try to dip the balls in your melted coating while they are warm then the butter in your frosting will mix with the coating and you will have a big mess.

When you are ready to dip your cookie balls, melt your chips in a bowl 30 seconds at a time. I usually add a little shortening to the melted chips to give it a smoother consistency. Then pull your cookie balls out of the freezer and start dipping. I usually use a fork and a spoon for this process. I use the spoon to cover the cookie ball with the melted coating and then when it is fully covered I take it out with the fork and give it a tap or two on the side of the bowl so the coating is not quite as thick. The white coating is kind of transparent, so it actually works better kind of thick to hide what's underneath. Then quickly sprinkle your topping on before the chocolate/vanilla coating hardens. If you don't have any sprinkles for the top - there should be enough in the bottom of the cookie bag.
I made my own cream cheese frosting to mix in with the crushed cookies, which I crushed in a mini food chopper.

Cream Cheese Frosting recipe:
1 8 oz. package of cream cheese - I used the reduced fat version
1/2 cup of butter or 1 stick
3 to 4 cups of powdered sugar - depending on the consistency you want (I used about 4)
1 teaspoon vanilla extract

You only need about one cup of this for these cookie balls depending on how much it takes so you have no loose cookie crumbs when mixed together.
You will have extra frosting which means you will need to find something else to make to use it - that's not really a bad thing. You could make some cupcakes, sugar cookies or cake bites to name a few ideas. I guess I better get busy making my next treat.

Thursday, March 14, 2013

More Pinterest recipes

Copycat Mexican Pizza from Taco Bell. I found the recipe here. I made two of these like the recipe says and each of us could only eat half of them. Next time I'm making one of them for us to split. I used the rest of the ingredients to make Nachos:

Next we tried some Asian food:
Baked chicken egg rolls with ham fried rice. I used this recipe for the eggrolls. I didn't have hoisen sauce so I used soy sauce. I also used chicken instead of pork because I had leftovers from a rotisserie chicken. We bought some sweet and sour sauce but didn't really like it so maybe I'll have to find a recipe to make my own next time. For the rice: I diced up some onion, green onion and ham and cooked it in a little olive oil. Then I added a scrambled egg and some cooked white rice along with some soy sauce and it was delish.
These are copycat southwestern eggrolls from Chili's with their avocado-ranch dipping sauce. I found the recipe here.
These were delicious! I left out the spinach and fresh parsley because I didn't have it and maybe I dislike spinach just a little bit. I also tweaked the sauce just a bit to my liking. I left out the vinegar and buttermilk and added some chili powder for a kick. I don't like avocados so I was a bit skeptical but it was great. My hubby wouldn't try it though. He doesn't like avocados either and wasn't willing to try it. The other thing I changed was that I baked these instead of frying them and they still tasted great! Bake at 400 degrees about 10 minutes on one side and 4 minutes on the other or until they look done to you.

And now for dessert:
Peanut better kiss cookies from Chef In Training. These were so good that me and the hubby went through these in about four days and then I had to make a second batch.
Cookie dough truffles. 
1/2 cup (1 stick) unsalted butter, room temperature
1/4 cup granulated sugar
1/2 cup packed light brown sugar
2 tablespoons milk
1/2 teaspoon vanilla
1 1/4 cups all purpose flour
1/2 teaspoon salt
1/2 cup mini chocolate chips
chocolate candy coating for dipping
If you are a cookie dough lover like me, you will love these. They won't make you sick either since there are no eggs in these. They are a little hard to dip. I have found that adding about one teaspoon of shortening to the melted chocolate makes the chocolate easier to work with.
Onto my next pinned recipe.......

Sunday, January 6, 2013

Carmelitas

I was craving a sweet treat and knew I wanted to try one of the hundreds of recipes I had pinned on Pinterest. I love cookie bars and I love caramel so this recipe looked like a winner.
I found the recipe here

32 caramel squares, unwrapped
1/2 cup heavy cream
3/4 cup butter, melted
3/4 cup brown sugar, packed
1 cup flour
1 cup rolled oats
1 teaspoon baking soda
6 ounces semisweet chocolate chips

Combine caramels and cream in a small saucepan over low heat. Stir until completely smooth; set aside. In a separate bowl, combine melted butter, brown sugar, flour, oats, and baking soda. Pat half of the oatmeal mixture into the bottom of an 8x8" pan. Bake at 350 degrees for 10 minutes. Remove pan from oven and sprinkle chocolate chips over crust. Pour caramel mixture over chocolate chips. Crumble remaining oatmeal mixture over caramel. Return to oven and bake an additional 15-20 minutes, until the edges are lightly browned. Remove from oven and cool completely before cutting.
*A stint in the fridge will help them cool off if you're pinched for time. They shouldn't be served cold, but all of that molten caramel takes a long time to cool down. They should be stored and served at room temperature.
**If you want to use homemade or store-bought caramel sauce in place of the caramel/cream mixture, use 1 1/4 cups of sauce.
***To make a 9x13" version, simply double the amounts. 
I used half and half because that's what I had on hand and it worked great with the caramels - also saved me some calories.
I'm really good at choosing really rich recipes to try lately and this is another one.
They are delicious.
The only thing that I would change is the next time I make these, I'm going to reduce the butter to 1/2 cup. The cookie base was too wet to crumble it on top and I had to add a bunch more oats - I would rather just cut out some of the butter so it's not so greasy.
I will definately make these again!
Another successful Pinterest recipe made, only hundreds more to go!

Thursday, November 22, 2012

Homemade butterfinger bars

Another Pinterest recipe is checked off my list.
I have been wanting to make these since I pinned them. I bought some candy corn on sale after Halloween and am just now getting to make these. In my defense, I have been busy with all of my other hobbies. The busiest time of year for me is October through December. I love to decorate for Halloween and Christmas as you probably know if you follow my blog.
I found this recipe on Pinterest. You can find it here.
This recipe uses three ingredients and there is no baking involved.
I like to have people taste these before I tell them the ingredients.
Most people are surprised that candy corn is an ingredient.

Here are some tips for making this recipe:
First of all, 1 lb equals two cups - I have a handy magnetic chart hanging on my refrigerator to help with that.
When you are combining the melted candy corn and peanut butter, there is a lot of stirring involved - I almost called in my husband to assist because my arm was tired.
Press the mixture evenly into your pan and let it sit for a while to cool.
I didn't have parchment paper so I just buttered my pan - it worked well but it was hard to get the whole square out of the pan at once. I wanted to cut these into little squares on a cutting board because it is easier to use a sharp knife for that and I didn't want to ruin my pan.
I dipped a few of these in the morning before work so I could pass them around and I made a big mistake in my rush.
Make sure you have waxed paper or parchment or something on the surface to make it non-stick while they are setting up. I put them straight on a metal pan and then had to use a spatula to scrape them off.
These are the ones I took to work - they are not quite as pretty:
When you melt your chocolate, make sure to add a little shortening to make the chocolate more smooth and a thinner consistency.
These worked better for me than anything I have ever dipped and I dip a lot of treats!
When dipping, make sure the pieces don't have a lot of crumbs on them or your chocolate will become lumpy.
My technique is to use a spoon to cover the piece and then use a fork to pick it up out of the bowl and shake the excess chocolate off on the side of the bowl.
Then the treat will just slide off the fork onto your waxed paper or you can use another fork to slide it off.
When they have dried - if you have some extra chocolate pooled at the bottom - you can just trim it off with a sharp knife.
We will be having ours at our Thanksgiving feast.
I hope these tips help you when you try your hand at them.

Wednesday, August 15, 2012

Heavenly Peanut Butter Chocolate Bars

These are heavenly! In fact, when I exclaimed that they were heavenly after my first bite, my husband came running from the other room because he thought something was wrong. I laughed and then gave him a bite and he was glad he came running because he agreed.
This recipe came from Pinterest. Yes, I actually made one of the many recipes that I have pinned and it was soooo worth it.
I found the recipe here from the blogger The Girl Who Ate Everything - I love her blog name BTW. After I made these heavenly bars I searched her blog for more yummy recipes and pinned a bunch more - hopefully I actually make some of them.
Then I got worried that I might eat the whole pan and really wanted to share this wonderful find so I took some to work and all my co-workers agreed that these were delicious!
So, when these are gone - which won't be long, I think I'll try another pinned recipe or one from my 60+ cookbooks.
Hopefully it will be just as delicious!
So, my advice is to try some of those recipes that you have pinned over time. You might just find a winner like I did!

Sunday, January 8, 2012

Chocolate graham crackers

 
For those of you that don't like to spend hours in the kitchen, here is a simple treat.
I always have some left over icing when I make cake bites and I hate to waste things.
So, I grab some graham crackers and make chocolate graham crackers out of them.
Yum!
If you don't have any icing, you can mix cocoa powder, powdered sugar, vanilla, a little butter and warm water until you get the right consistency and flavor.
That's the way my mom always made them when I was a kid and they were just as yummy!

Monday, August 29, 2011

Camping fun

When we get too hot in the summertime, we take off to Cedar Mountain.
Our home away from home.

Lots of 4-wheeling

Lots of views

Cool flowers

Lots of relaxing

Chilling by the fire

Eating S'mores

Our favorite thing to make when we go camping is dutch oven peach cobbler.  I never seem to get a picture of it because we are always eating it at 10 p.m.
For some reason, we always eat super late on the mountain. I guess we get too busy playing.

Here is the super easy Peach Cobbler recipe:
Lazy Cobbler
Use a 12" dutch oven
2 cans slice peaches with syrup (29-30 oz cans)
1 package white or yellow cake mix
Ground cinnamon to taste
1/3 stick butter or margarine
Place dutch oven over 15 hot charcoal briquettes. Pour peaches in dutch oven. Sprinkle dry cake mix evenly over the peaches. Sprinkle cinnamon around on top to taste. Cut butter in pieces and spread evenly on top. Put the lid on the dutch oven and place 10 hot briquettes on top. Bake for 45 minutes or until done. Serve with whip cream on top or with ice cream. Yum! Sometimes I even eat the leftovers for breakfast!

One thing has put a little damper on camping this summer:
Yes, it says Bear Country and it is posted right below our camp. When we were up in June, we saw a lovely big brown bear right across from our camp. It's a little freaky to walk back in the trees or sit out by the fire at night. Casey just brings his 45 and keeps it by his side and I keep him by my side.

Camping season on Cedar Mountain is about over - hopefully we won't see the bear again!


Thursday, July 7, 2011

Peanut butter cookies

These cookies were delish and turned out great!  I have been making a lot of cookies from mixes so I was so glad when I took the time to make these from scratch and they turned out!
I found the recipe here
I used smooth peanut butter and half of the chocolate chips.
It made 3 dozen cookies and my husband and I ate them all!
I will definitely make these again!