Thursday, November 28, 2013

Fall felt banner

I thought the wreath on my front door could use a little finishing touch and I thought a felt banner could withstand some weather elements unlike the paper banners I featured earlier.
So I went to work.
I bought a pack of chipboard with two sizes of banner shapes in it - I just use them for patterns when I make my holiday banners. I chose four colors since I was making one for the word "fall" and cut out my shapes.
I also had some lengths of twine I tied together to fit the length of the banner - I'm all about using up my scraps for these last two projects. Then I decided I liked the look of the knot in the middle so I cut two more small pieces to tie between the other banner pieces.
Then I took one of the other colors of felt that I had bought and traced four circles out of it to go under my letters - I used a chipboard circle to trace around.
I actually had my banner all ready to go a few days ago but I didn't have the right glue for it. When you glue felt to felt you really need to use either a felt glue or at least a good fabric glue. I actually ended up using Aleene's Fabric Fusion glue for this and it seems to be holding together well. You do need to let it dry the recommended 2-4 hours though. I tested it after 30 minutes and it was not holding together.
Here's my finished banner on my wreath.
Got it done in the nick of time. Now it's time to put out Christmas decor.

Tuesday, November 26, 2013

Fall paper banners

I put this memo board up with my fall decor in my entryway and thought that it looked a little bare so I made these banners for it.
Here are the supplies I used and how I made them:
 I started out with the tags. I had these tags already which will be great for a Christmas project but they weren't the right colors for fall so I used some scrap paper and traced some tags in the colors I wanted. You could also use a craft punch which I pulled out after I had cut out my tags thinking that would have been much quicker but oh well - I like the shape of these too.
You will also need some scissors, glue, pencil for tracing tags on scrapbook paper, stickers to spell out whatever words or sayings you want and embellishments. You will also need some ribbon or twine to link all the tags together.
This is how my tags looked before I put my letters and embellishments on.
And below are pictures of my finished banners.


Saturday, November 16, 2013

DIY Magic Wands

Glitter Magic Wands
I actually made these for a themed work retreat. So, now that I've worked out all the kinks - I can make some for myself. In a few weeks that is - cause I'm kind of sick of making these!
I actually really love how these turned out but after making 50 of them at once, I need a break!

Here's the breakdown on how to make these for yourself:

Let's start with the tools you will need to make these:
For the wand itself, we first thought of using dowels but they aren't tapered so then we thought of paintbrushes and then we thought of chopsticks but we needed to find round chopsticks so I searched the internet and found a company that sold them in packs of 20 and ordered them. The foam is used for setting the wands in while they are drying after decorating them with the hot glue.
We (my co-worker and I) found that we had to sand the clear coat off the chopsticks before we painted them or the paint rubbed right off. After all that painting, we didn't want to paint anymore so we found glitter glue sticks for the decorating of the wands.
I found a pack of 25 assorted glitter hot glue sticks at Michaels for $6.99. We actually got 75 finished magic wands from 50 glue sticks. It just depends how much glue you want to put on your wands.
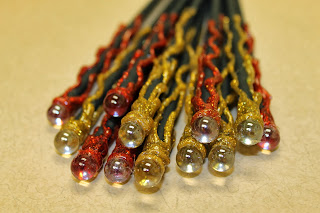
You also need a bag of clear small marbles for the top of the wands - you could probably use colored marbles but the clear ones let the glitter glue shine through and look really cool.
Here are some pictures of the finished wands:
Tips I learned from making these:
Put a dot of hot glue on the top of the chopstick and set the marble on top and let dry. Then circle the marble in hot glue. Then go crazy decorating each wand with the hot glue  - it gets easier as you go. We found that going back and adding some drips after the first layer dried worked well and added some dimension to the wands.
Here are some wands that my co-worker made:
As you can see, she used a bit more hot glue then I did on these and they look great so it's up to you to decide how much glue you want to use on them. We also realized that we loved the ones that had a mix of two colors of hot glue on them from switching from one color to another in the middle of a wand so I would mix the colors up more next time.
Most importantly, have fun while making your magic wands!

Tuesday, November 12, 2013

Peanut butter and chocolate cereal treats AKA Scotcheroos

This recipe had me at peanut butter and chocolate. I love that combination of flavors. Today at work I had the worst craving for something sweet. So much so that I almost went out and bought me some cookies from one of our local cookie shops.
As soon as I got home, I went to work trying to decide which of my hundreds of "Sweet Treats" pins I should make. I wanted something quick to make since I still had to make dinner too. I actually have made these twice before right in a row since they were so good.
This recipe is all over Pinterest - but here it is:
1 cup white sugar
1 cup corn syrup
1 cup creamy peanut butter
6 cups cereal - Chex, Rice Crispies - whatever you have on hand
1 cup chocolate chips
1 cup peanut butter chips or butterscotch chips
1 tsp vanilla
Stir the sugar and corn syrup in a sauce pan over medium heat until it comes to a boil. Then take off the heat and stir in your peanut butter - if you want the peanut butter flavor to stand out more then add another 1/2 cup. After the peanut butter is evenly stirred into the mixture, pour over cereal mixture and coat evenly. Press mixture into a greased 9x13 pan or just turn out onto parchment paper if you want to just pull chunks off to eat it like I do. Melt your chips together in the microwave in 30-second intervals. When melted, stir in the vanilla. Pour over the top of the cereal mixture and let set before cutting or just drizzle it on top like in my example.
I used half a bag of peanut butter and milk chocolate chips on these. I used a Ziploc bag to melt them in and then cut the corner off to drizzle over the cereal mixture.
This recipe is gluten-free also. Just check your cereal - I hear some of the off-brands are not always GF.
If you cut them in bars - which makes it easier if you are taking them to a party - they look something like this:
This is a pic from the first time I made these. Either way - they are delicious!

Sunday, November 3, 2013

Toilet nook redecorated

I think I chose the smallest area in my house to redecorate. My husband and I are probably the only ones that will even see this area too since it's the toilet nook in our master bathroom. I didn't take any before pictures because I didn't think it would be worth a post but imagine a white plastic garbage can on one side of the toilet and a white and red toilet plunger and scrub brush on the other.
I did however get this picture with the blinds still up - they are down now. After I had finished decorating the space - I decided to pull the blinds down since they were dirty and didn't work well anyway. I did put my old decor up and took this picture to show the difference.

Here are more photos of this small space as it looks now:


The best part about this is I only had to buy the new plunger, scrub brush and toilet paper holder - which I found at Ross for a killer deal. I had the two fleur de lis pieces already as well as the bird cages.
I'm so happy with this small space I had to share it!